A few quick start tips for using
EZNEC
antenna design software for yagi antennas.
This is assuming a yagi antenna for 440 MHz band.
Ground: start with “free space”. If the antenna model is too close to the ground, the simulation can be unrealistic. Once satisfied in free space, consider real ground (non-free space)
Number of segments: suggest 5 per wire, with free EZNEC license
Number of yagi elements: 3..5 elements are possible with free EZNEC at 440 MHz.
CMake by default searches for shared libs before static libs.
Sometimes a project needs to specifically link external or internal static libs, even if shared libs are present.
A simple cross-platform way to do this is to set
CMAKE_FIND_LIBRARY_SUFFIXES
before any find_library() or find_package():
set(CMAKE_FIND_LIBRARY_SUFFIXES.a.lib)
This takes advantage of de facto static library extensions for macOS, Windows and Linux, using CMake system variables.
The default values for CMAKE_FIND_LIBRARY_SUFFIXES are set by (depending on platform and compiler) CMake
Reading RINEX files in Python or other languages historically required compiling or buying complex software.
The
GeoRINEX
Python 3 program and library to be used with RINEX OBS and NAV files, including Hatanaka compressed files or other compression wrappers like ZIP.
GeoRINEX can even read only every N seconds from a RINEX file with option georinex.load(..., interval=N).
This greatly speeds up reading where coarser time intervals than the RINEX file provides is needed.
GeoRINEX uses performance-oriented techniques to read RINEX files at speeds approaching compiled languages, using Pure Python + Numpy and Xarray for metadata rich results.
If you use GNSS and RINEX in your work, you may like
GeoRINEX
for Python 3.
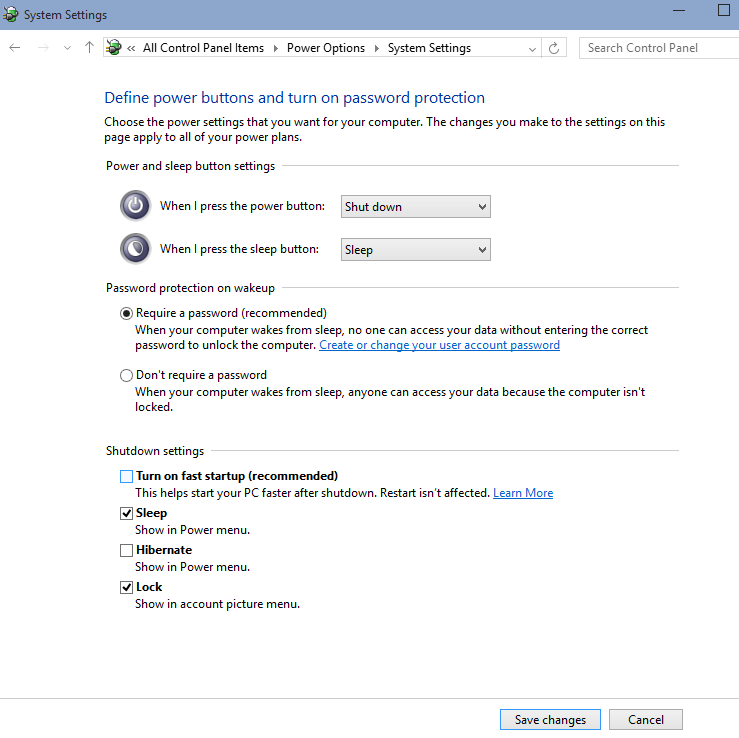
For those dual-booting Windows and Linux, it’s useful to disable Windows Fast startup so that you can access the Windows partition from Linux.
Disabling Fast Boot may add a few seconds to boot time.
When you shutdown your PC, Fast Boot actually reboots and then hibernates.
This locks the Windows partition so that Linux can’t access it.
Disable Fast Boot:
⊞+rpowercfg.cpl → “Choose what the power button does”.
We typically disable hibernate as well to save on SSD wear.
Disable fast boot
BitLocker and dual-booting: If BitLocker is enabled, Linux cannot access the Windows partition.
Fast Boot SSD wear: Fast Boot just like hibernate increases solid state drive (SSD) wear, since you are dumping an image ~ RAM size to disk on each Fast Boot shutdown.
OpenSSH built-in.
Cygwin isn’t necessary for Windows SSH servers any more.
The robust OpenSSH server on Cygwin allows SSHing into a Windows PC for secure port forwarding Windows RDP.
Use Public Key Authentication – it’s far stronger than any human usable keyboard password.
From Windows Command Prompt:
setup-x86_64.exe -Bq -P openssh
Cygwin SSH server setup: start Cygwin64 using “Run as Administrator” and type
ssh-host-config
Privilege separation: yes
strict modes: yes
sshd as service: yes
value of CYGWIN for daemon: (just press Enter key, don’t type anything)
use a different name: no
The Cygwin SSH server starts itself on reboot of Windows, but if you need to start it manually (e.g. for the first time upon installing)
cygrunsrv -S sshd
Test the SSH server:
login to the Windows Cygwin SSH server from another PC.
Under services.msc observe the Status “started” for service “CYGWIN sshd”, and under the General tab the “path to executable” should be something like c:\cygwin64\bin\cygrunsrv.exe
Configure Cygwin SSH server in /etc/sshd_config.
To make changes take effect:
cygrunsrv -E sshd
cygrunsrv -S sshd
Disable Cygwin Windows SSH server with Cygwin “Run As Administrator”:
cygrunsrv -E sshd

cygrunsrv -R sshd
Reboot and verify the former SSH server is not operating.
CYGWIN sshd should not be in services.msc anymore.
system error 1069 has occurred. The service did not start due to a logon failure
check the password on the “privileged server” cyg_server.
Python users typically use a non-system Python distribution such as Miniconda.
Python distributions typically allow easy switching of Python version.
Where Linux system Python must be used, the default Python version can be switched persistently with update-alternatives.
Update-alternatives without sudo: a one-time setup.
Configure shell to use ~/.local/bin instead of system-wide /usr as follows:
mkdir ~/.local/bin
Add to ~/.profile:
exportPATH="$HOME/.local/bin:$PATH"
Enable switching Python default between Python versions with these one-time commands:
GNU Radio is trivially easy to install on Ubuntu, which includes the UHD driver.
apt install gnuradio
DO NOT use GNU Radio from a virtual machine in general with an SDR, as typically many packets will be lost and the data will not be useful.
The typical best choice is to use a
GNU Radio live USB image.
Frequent GNU Radio users often dual boot into Ubuntu for working with SDR.