The official Mathworks
MATLAB extension for VS Code
brings powerful MATLAB support directly into Visual Studio Code.
Edit .m files with rich syntax highlighting, code snippets, folding, and linting/code analysis.
Run and debug MATLAB scripts and functions straight from the editor.
An integrated MATLAB terminal for interactive commands.
One of the standout productivity features is Go to Definition (also available as Peek Definition and Find All References).
For most supported languages in VS Code — and specifically with the MATLAB extension when paired with a full MATLAB installation — Ctrl+Click (or F12) on a function, variable, or class name to instantly jump to its definition, even if it’s in another file or referenced project.
While Matlab has comprehensive Git support built in, VS Code’s rich array of Git extensions and integrations can provide a more seamless experience for version control, especially for users already familiar with VS Code’s interface.
Mix MATLAB with Python (or other kernels) in the same notebook.
Access browser-based MATLAB capabilities for interactive tools and apps.
This is ideal for exploratory analysis, documentation, and sharing reproducible workflows.
Matlab itself has a script-based notebook feature “Live Scripts” as well.
People at risk such as stalking victims, executives, VIPs, security staff, defense / aerospace and other at-risk device users should consider risks involved in typical wireless use patterns.
The proliferation of BYOD, wearables and IoT devices in everything from alarm clocks to utility meters increases the attack surface.
State-level actors consider the value of broad swaths of population collection as well as high-value targets.
The CDC 2012 National Intimate Partner and Sexual Violence Survey
NISVS
notes that about 1 in 6 women in the USA have been stalking victims.
Popular media has depicted “burner phones” as a tactic to avoid tracking.
Burner phones can be associated with a victim for subsequent attacks when the attacker knows they’re in proximity of the victim and the victim has the burner phone on.
At-risk users should consider the risks of having Bluetooth and WiFi enabled.
The attacker typically has the advantage of time, and can patiently attack the weakest victim device and escalate from there.
Sniffing devices can be left behind inside innocuous devices such as
power strips.
Bluetooth 5 and WPA3 include substantial security benefits over earlier standards.
Devices may implement the standards imperfectly across their firmware / software stacks, and some new devices still don’t support WPA3, leading some WiFi routers to support hybrid WPA2 / WPA3 modes.
Devices wirelessly beacon information useful to the attacker.
An attacker knowing the victim’s device type can implement a spear phishing attack–perhaps a text message pretending to be from the victim’s employer or wireless carrier with a link to a zero-day exploit.
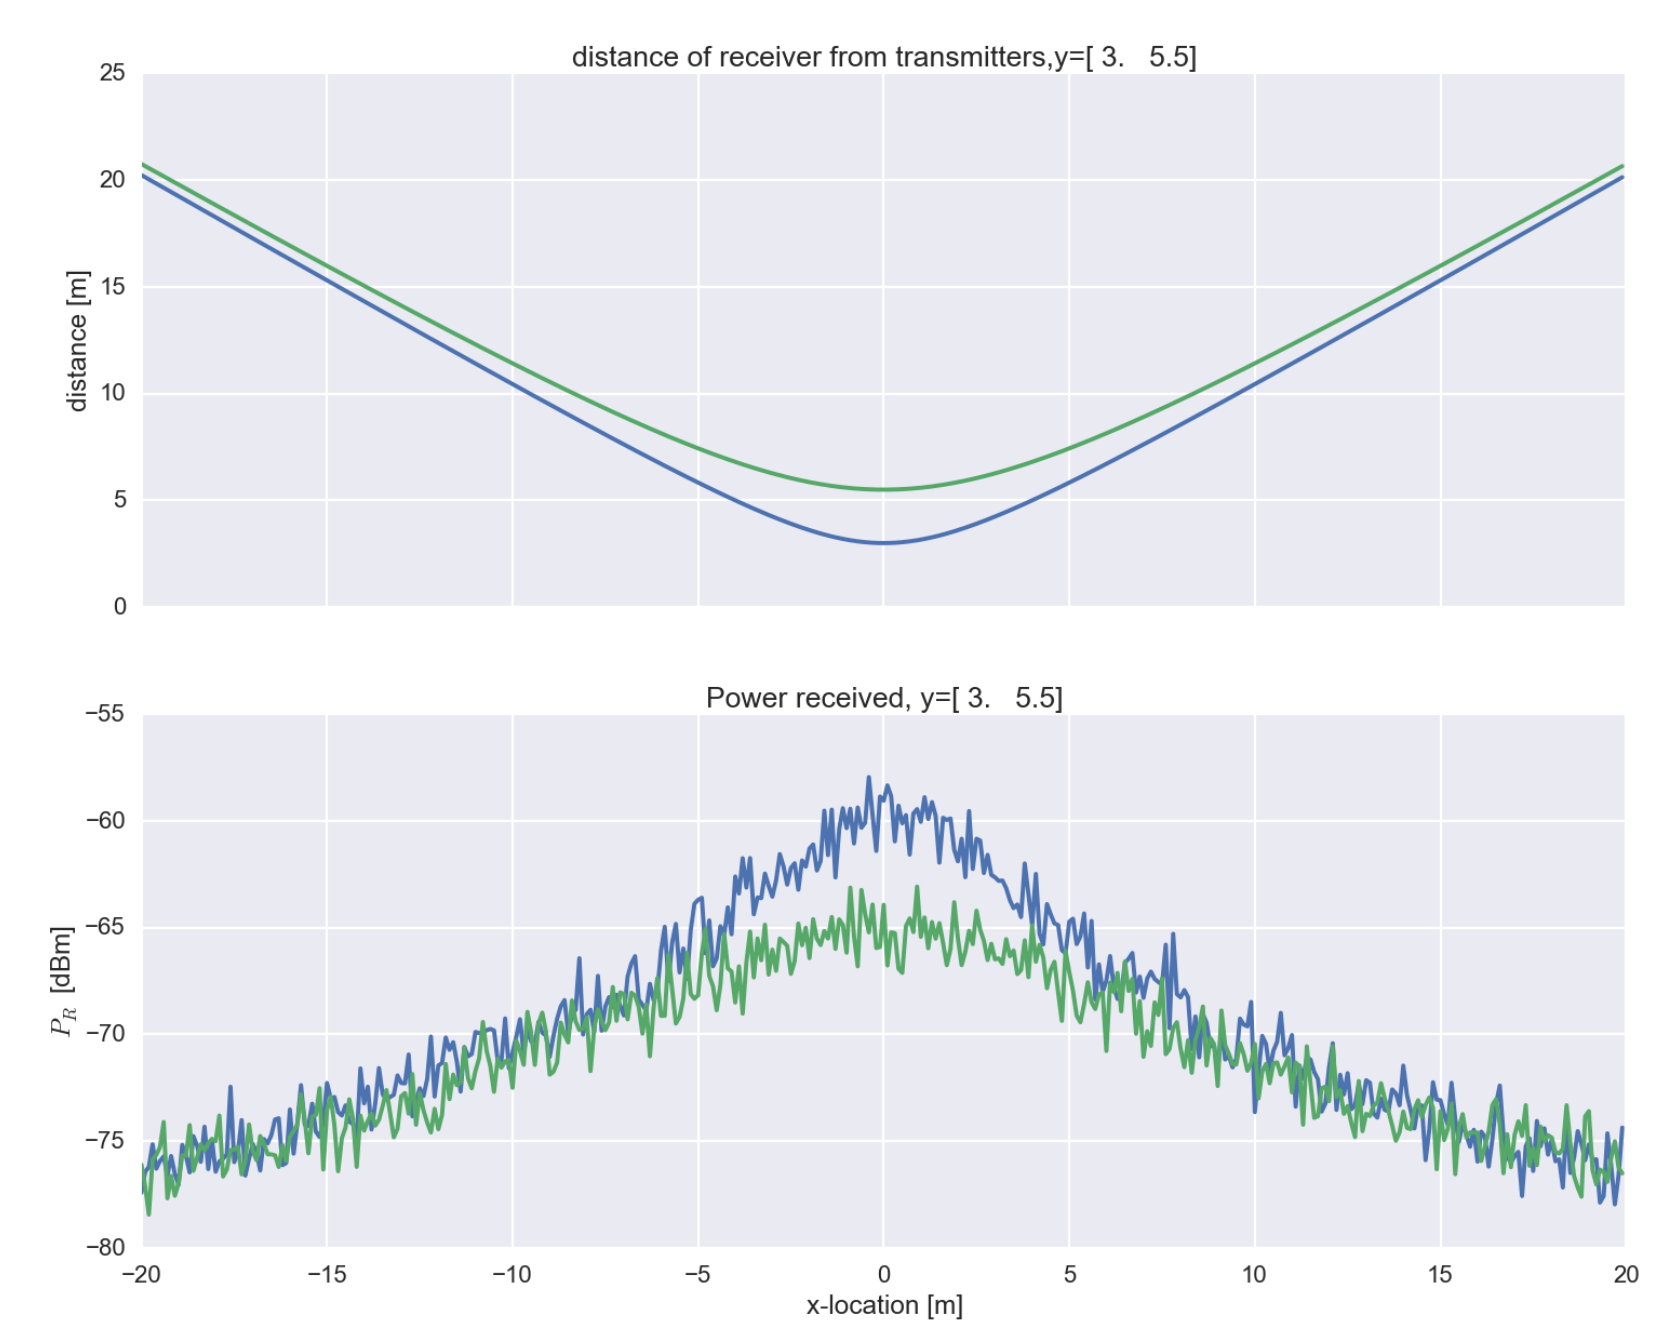
Signal strength can pinpoint a user’s location even in a crowd.
Research on Wi-Fi probe request monitoring (e.g., Musa & Eriksson, SenSys 2012) shows that signal strength differences can distinguish devices separated by only a few meters, even when the attacker is 10–20+ meters away under favorable conditions.
The typical victim has vulnerable devices including smart TVs, pre-WPA3 WiFi networks, Bluetooth speakers, and WiFi security cameras with old firmware.
Multiple WiFi APs in the victim’s vicinity, made popular by consumer WiFi mesh networks provide a
passive radar
to track the victim’s approximate location in a home or office by a passive attacker.
Signal strength target discrimination vs. attacker distance
Wireless energy knows no borders, with maximum range limited by the
inverse square law
and obstructions.
Microprocessors with weak encryption to save computation / energy and lack of OEM liability leave little supply-side motivation to fix these personal and national security risks.
Bluetooth speakers commonly found in homes and offices often support auto-reconnect to previously paired devices.
Speaker may automatically enter discoverable / pairing mode when powered on and no known paired device is in range.
This allows anyone nearby to pair with the speaker without physically interacting with it — a significant privacy risk.
See also the
Stealtooth attack.
The attacker could monitor the audio input in headset mode (for speakers with microphones for two-way audio) without the victim knowing they’re being listened to.
Suppose the attacker walks down a street listening for auto-discoverable HSP devices, whether speaker or headphones or other device with microphone.
Many neighborhoods have HSP devices left on 24/7, which can be used to determine user occupancy patterns, travel plans and other confidential victim information.
Bluetooth Low Energy (BLE) uses 40 channels in the 2.4 GHz band.
It has three primary advertising channels at 2402 MHz, 2426 MHz, and 2480 MHz.
These frequencies were specifically chosen to sit between common WiFi channels for reduced interference.
The remaining 37 channels are primarily used for data connections, and can be used for secondary advertising with Bluetooth 5.0+.
A common attack vector of legacy Bluetooth pairing is when the attacker hears pairing and trivially cracks the key.
The attacker can then at any time force unpairing, masquerade the connection and take unwanted actions such as crash the device wirelessly or passively eavesdrop.
This attack is mitigated by
LE Secure Connections
when implemented and enforced by both devices.
Maximum range of detecting BLE can be on order of 1 kilometer with inexpensive high gain antennas.
Without special antennas, small BLE devices are typically detectable to 50 meters or so.
Inexpensive software defined radio (SDR) devices like
HackRF
enable passive monitoring of already paired devices (as with Wifi) based on periodic updates (100ms to 10sec).
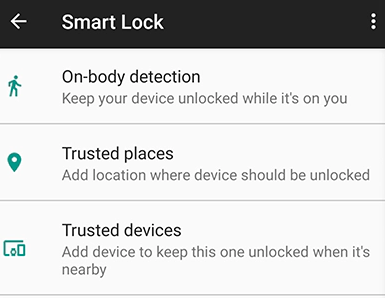
Android “Smart Lock” is good for attackers, not victims.
If connection can be intercepted and masqueraded, an attacker can physically obtain the unlocked device, install malicious software and return the device undetected.
Corporate device policies and end users should consider blocking this.
Windows has a similar feature where Bluetooth-connected device is used to imply user proximity.
Android Smart Lock--anything but!
Suppose the attacker passively sniffs the victim UUID and learns the BLE simple channel hopping pattern.
BLE channel hopping pattern is predictable and the UUID is in the clear.
The
CRACKLE BLE attack
enables an attacker to jam the victim BLE wearable, breaking
connection and leading the victim to re-pair the wearable (which is the point of vulnerability).
The attacker can crack the pairing exchange and then implement passive monitoring or access email, text, phone, calendar, fine location, apps, etc. from 10-100 meters distance from victim.
WiFi devices (smartphones, wearables, laptops) periodically send probe requests to discover nearby networks.
While modern operating systems such as
Apple macOS and iOS,
Android
have largely stopped broadcasting lists of previously connected visible SSIDs, they still send probes for “hidden” WiFi networks that a user may have connected to in the past.
Windows has been observed to still send probe requests for previously connected visible SSIDs, which can be used to track the victim’s location and movement patterns.
These probe requests always include a source MAC address — though most modern devices randomize this MAC for privacy.
Operating systems for mobile devices and computers have generally implemented a user option to
rotate random device WiFi MAC addresses.
A user may disable this random MAC address without realizing the security implications.
Even with
random MAC,
the victim beacon/probe signal strength can still be used as a means to track the victim’s proximity and approximate location.
Homes with smart TVs, WiFi security cameras and baby monitors typically use obsolete pre-WPA3 WiFi networks with weak protocols such as WEP, WPA or WPS.
Cheap security cameras often have unencrypted or weakly encrypted password exchange.
Once the WiFi password is cracked, the attacker can then exploit the typically insecure WiFi devices throughout the modern home or office.
The victim attempted to secure their home with surveillance, but made themselves substantially less secure against wireless attacks.
Upon forking another project’s repository to make contributions, one might have enabled GitHub Actions for the fork.
If there are scheduled actions, then GitHub Actions will keep running on the forked repository, which can consume resources and is probably not desired.
The simplest solution is to disable GitHub Actions for the forked repository, which is done from the URL of this form:
CMake can tell the default
generator
for the current platform without configuring a project.
This is useful for build scripts that want to detect the generator default for CMake without having to configure a project first.
On Unix-like platforms, the default generator is typically “Unix Makefiles”.
On Windows, the default generator is the latest Visual Studio version installed on the system and supported by CMake.
With MSYS2 on Windows, the default generator is “MinGW Makefiles”.
Determine the default CMake generator on Unix-like platforms:
If the environment doesn’t have a C or C++ compiler available, CMake might fail to determine the default generator.
A missing compiler would likely only be an issue on Windows or minimal Linux / macOS / Unix environments.
On Unix-like platforms, there may be a working directory named “__cmake_systeminformation” created by CMake when running the above command.
This directory can be deleted.
To avoid using the current working directory on Unix-like platforms, run the above command in a temporary directory:
A platform-independent, self-cleaning temporary directory can be used with Python:
importsubprocessimporttempfilewith tempfile.TemporaryDirectory(ignore_cleanup_errors=True, delete=True) as temp_dir:
result = subprocess.check_output(
['cmake', '--system-information'],
cwd=temp_dir,
text=True )
for line in result.splitlines():
if line.startswith('CMAKE_GENERATOR '):
default_generator = line.split(' ', 1)[1].strip().strip('"')
print(default_generator)
break
While developing a software project, it may be useful to verify the stability of the program or library by denying the ability to execute child processes.
This helps ensure the top program is stable in such cases by using an interposer.
This technique is demonstrated for Linux, macOS, and Windows on compilers including GCC, Clang, MSVC, NVHPC, and oneAPI.
This is not a cybersecurity sandbox, but rather a limited development tool to test stability of the top program when child process launches fails.
Use this interposer demo by:
git clone https://github.com/scivision/interposer-nochild

cd interposer-nochild

cmake --workflow --preset default
In Unix-like shells, a
pseudo-file
can be used as input of script for CMake.
CMake can read from a pseudo-file or stdin on the command line, allowing one to run CMake script cmake -P ... commands without creating temporary files.
This method by design is only for CMake script role; it does not work with other
CMake roles
like PROJECT.
Pseudo-file example for Unix-like shells and
CMake ≥ 4.2:
That’s useful to print the CMake version without parsing the output of cmake --version or creating a temporary file with the CMake script.
On Windows in PowerShell or Windows ComSpec, there isn’t a direct equivalent method to use stdin / CONIN$ or a pseudo-file.
Use a temporary file instead, or use WSL to run the above Unix-like shell examples.
There was a previous
attempt to add cmake -P - support for stdin
but as of this writing it was closed without merging.
The Wilson 1000 is a popular high-performance magnet mount antenna for CB radio and 10 meter amateur radio.
The screw-on loading coil design may lead to the magnetic base becoming loose from the antenna mount, which can cause high SWR spikes that could damage the transmitter.
Eventually, the antenna could detach from the magnetic base and fall off the vehicle, which is a safety hazard.
The symptom of this is when the magnetic base is on a metallic surface, gentle twisting of the plastic shroud allows rotation of the shroud over the magnetic base - this is a problem, the shroud should not be able to rotate over the magnetic base when the antenna is properly tightened.
This procedure works for similar antennas with a screw-on coil including the Wilson 5000, Stryker SR-A10MM, Radio Shack 21-940A, and others.
The tools required to fix this are a 9/16" socket, a 9/16" wrench, and a 11/16" wrench.
An adjustable wrench may be used, but a 9/16" socket is strongly recommended along with whatever wrench is used.
Gently peel off the vinyl sheet covering the magnetic base and set it in a clean space as it will be reused.
Gently lift off the plastic shroud and slide it down the cable several inches to expose the nut and coax connection to the antenna base.
Use the 9/16" socket under the magnetic base and the 9/16" wrench on the nut above the magnetic base to tighten the nut to the magnetic base.
Don’t use excessive force as the nut can be stripped or the magnetic base can be damaged.
After tightening the nut, slide the plastic shroud back up and tighten the shroud with the 11/16" wrench to secure it to the antenna base.
Finally, reapply the vinyl sheet to the magnetic base to protect it from corrosion and to maintain the appearance of the antenna.
Be sure not to crinkle the vinyl sheet as this can affect antenna SWR performance and the attachment strength of the magnetic base to the vehicle.
GCC GFortran, LLVM Flang, and Intel oneAPI are among the most advanced free-to-usemodern Fortran compilers.
Currently we recommend writing Fortran code to support:
To get recent GCC is usually straightforward.
Red Hat should use
GCC Toolset.
macOS Homebrew quickly adds the latest
GCC version.
If Ubuntu gfortran repo
defaults
aren’t adequate, get recent Gfortran via
PPA.
Here are some of the major changes in Gfortran by version:
Gfortran 16 adds improved Fortran 2023 support including the split intrinsic subroutine, optional lower argument to c_f_pointer, and additional trigonometric functions (sinpi, etc.). It also enhances coarray support with native shared memory multithreading on single-node machines and better Fortran 2018 TEAM handling, improves Fortran 2003 parameterized derived types (LEN parameters), and adds Fortran 2018 extensions to the IMPORT statement, the REDUCE intrinsic, and the new GENERIC statement.
Gfortran 15 adds experimental support for unsigned modular integers (-funsigned), Fortran 2018/2023 locality specifiers in do concurrent, and stricter format string parsing (missing commas in I/O descriptors are now rejected by default). The module file format is now incompatible with GCC 8–14 (but older .mod files can still be read). Coarray support has been significantly reworked.
Gfortran 14 adds -std=f2023 (prepares for Fortran 2023) with increased free-form line length (10,000 characters) and statement length (up to 1 million characters). It also improves preprocessing output with -save-temps (.fii/.fi files).
Gfortran 13 completes full support for finalization and improves OpenMP 5.0 support for Fortran (e.g. some non-rectangular loop nests).
Gfortran 12 enhances OpenMP 5 and OpenACC 2.6 support. Numerous bugfixes. bind(C) with character length greater than one. This is a groundbreaking improvement for C interoperability for character and strings, even C++ <string> using ISO_Fortran_binding.h.
Gfortran 11 completed OpenMP 4.5 support.
Gfortran 10 added select rank.
Gfortran 9 added random_init() to initialize the random generator seed.
Gfortran 8 added automatic nested loop exchange with do concurrent, actual argument array with too few elements for dummy argument now errors, initial support for parameterized derived types (simply define kind at initialization) and coarray support for teams. Standard flag -std=f2018 added and deprecated -std=f2008ts.
Gfortran 7 added derived type IO select type. Complete Fortran 2003 support, Fortran 2018 non-constant stop and error stop codes, and -fdec- options to help compile very old non-standard code.
Gfortran 6 added Fortran 2008 submodule support, useful for large projects to save compilation time and allow powerful use scenarios.
Fortran 2003 deferred-length character are
useful
for avoiding bothersome trim() everywhere.
GCC 5 added full support for OpenMP 4.0, Fortran 2003 ieee_ intrinsics, Fortran 2008 error stop in pure procedures with constant error code.
GCC 4.9 added Fortran 2003 deferred-length character variables in derived types.
GCC 4.8 supported Fortran 2008 polymorphism, including select type, class(*), type(*), and Fortran 2018 assumed rank dimension(..).
GCC 4.6 was the first version of Gfortran reaching beyond Fortran 95, with Fortran 2003 deferred-length character variable and Fortran 2008 impure elemental support.
GCC 4.5 added Fortran 2008 iso_fortran_env.
GCC 4.4 added initial support for polymorphism and OpenMP 3.
CMake allows switching parameters based on compiler version.
This is very useful for modern Fortran programs.
Example CMakeLists.txt for Fortran compiler version dependent options.