A common numerical operation is cumulative summing.
The cumsum() operation has the output array of the same shape as the input array, with each element as the sum of all the previous elements in that dimension.
Matlab
cumsum
and Python
numpy.cumsum
operate quite similarly.
When translating code between Matlab and Python, as always keep in mind Matlab’s one-based indexing vs. Python’s zero-based indexing.
That is, when using cumsum() over an axis, be sure to select the correct axis–Matlab cumsum(..., 1) is equivalent to numpy.cumsum(..., axis=0).
When working with large grids, the grid itself can consume considerable memory.
Large grids can require more advanced techniques like working with interpolants and using sparse grids.
Many grids that aren’t too large can use common functions like “meshgrid” to make certain plotting or linear algebra operations easier.
Matlab and Python (Numpy) can readily work with these data structures.
We show the differences and similarities to allow understanding and translating code between Matlab and Python.
Matlab
meshgrid
and
ndgrid
generate distinct data for the first two dimensions, but other dimensions remain the same.
This is due to meshgrid() being intended for plotting, and ndgrid() intended for matrix operations.
Numpy is used for most array computation in Python–many Python numerical libraries use Numpy internally.
Numpy has additional advanced grid generation functions numpy.mgrid() and numpy.ogrid()–here we will focus on
numpy.meshgrid.
numpy.meshgrid also has copy=False and sparse=True options that allow conserving memory.
For simplicity, we will use the defaults, which is a dense copied mesh.
Equivalent to Matlab meshgrid():
x,y = numpy.meshgrid([1,2], [1,2], indexing='xy')

>>> x
array([[1, 2],
       [1, 2]])
>>> y
array([[1, 1],
       [2, 2]])
Equivalent to Matlab ndgrid():
x,y = numpy.meshgrid([1,2], [1,2], indexing='ij')

>>> x
array([[1, 1],
       [2, 2]])
>>> y
array([[1, 2],
       [1, 2]])
A recent PyHC presentation given by Ian of US-RSE had a discussion where a few journals relevant to publishing research software were noted.
We have used
engrXiv
for software preprints.
Refereed journals include:
When using Intel oneAPI compilers on Windows, you may get a message like:
INTERNAL ERROR: pgopti_Create_Full_Path: buffer too small
This is probably caused by a filepath that’s more than 139 characters.
You may not see the paths printed as being that long, because CMake with Ninja does preprocessing on each Fortran file that lengthens the filename.
The fix is to make the project paths shorter.
Users may have to build code from a directory nearer the top of the filesystem hierarchy.
ExFAT is faster than NTFS by up to several percent
hard drive write speed.
ExFAT allows a hard drive to easily be
read across operating systems.
Windows Subsystem for Linux can
read ExFAT
drives.
Formatting a disk deletes all data on the drive.
The system hard drive %SYSTEMDRIVE% for Windows OS MUST be NTFS.
NOTE: If the hard drive is unformatted, it will not have a drive letter.
Once sure the drive is empty or want to erase the contents to make it ExFAT, do this through Disk Management.
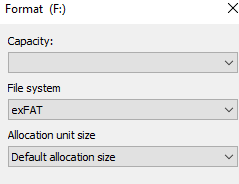
Format a drive to ExFAT from Windows Explorer by right-clicking on the drive to format and selecting “Format” → File System: “ExFAT”
Format ExFAT
Alternatively, format a drive to ExFAT from Command Prompt or PowerShell by:
format driveletter /FS:exFAT /Q
Format a drive to ExFAT from Disk Management by running diskmgmt.msc and right click the new drive → Format.
If NTFS is the only option, use Windows Explorer to format to ExFAT after first formatting to NTFS here.
Switching to CMake from autotools or plain Makefiles gives generally better support of many operating systems, in particular Windows.
Another benefit is generally faster speed of configuration and build.
In 2020, MonetDB
switched from autotools to CMake.
They observed MonetDB with CMake builds in 40% of the original time.
Note also the improvement due to Ninja instead of GNU Make.
We have converted a number of projects from autotools to CMake.
Consider automated
autotools to CMake script
and then manually compare or redo by
inspection
of the autotools scripts.
In general, livestream data bandwidth depends on the video content (lots of motion vs. talking head) and wireless conditions.
YouTube Live has a wide range of
livestreaming modes.
Consider 480p to start to keep the connection from dropping out, with data bandwidth of 500 - 2,000 kbps ~ 16 Mbyte/minute.
Use variable bitrate to dramatically reduce upload bandwith needed for typical livestreaming scenes.
OBS Studio
is among streaming software supporting
HLS
for ease and robustness or low latency RTMPS.
Hugo
shortcodes
are a powerful, easy way to template code used in blogs and websites.
Ana Ulin describes a
one-line Hugo shortcode
to inline HTML in Hugo:
Under the top-level Hugo website Git directory, add file “layouts/shortcodes/rawhtml.html” containing:
{{.Inner}}
Then in the Markdown file for the particular blog post, do like (removing the space between the left brace and the left caret):
Compare files between Git branches with a GUI like
VS Code
or
Meld,
showing all files different between the current Git branch to another Git branch “develop”:
git difftool develop
Compare a single file to another Git branch “develop”:
For projects consisting of more than a few files, or of files in different code languages, it can sometimes be beneficial to only run certain workflows depending on which files changed.
For example, consider a Fortran-based simulation where the CI takes minutes or hours to run, with associated Python plotting code.
If only the plotting code is changed, it might not be necessary to CI the entire simulation, but instead test just the Python code.
This can be arranged via separate .yml files under the repo’s .github/workflows/ directory.
Example: only run Python analysis script tests (say, under “scripts/”) when analysis scripts are changed.
If Fortran code or Python interface scripts are changed, run other CI.