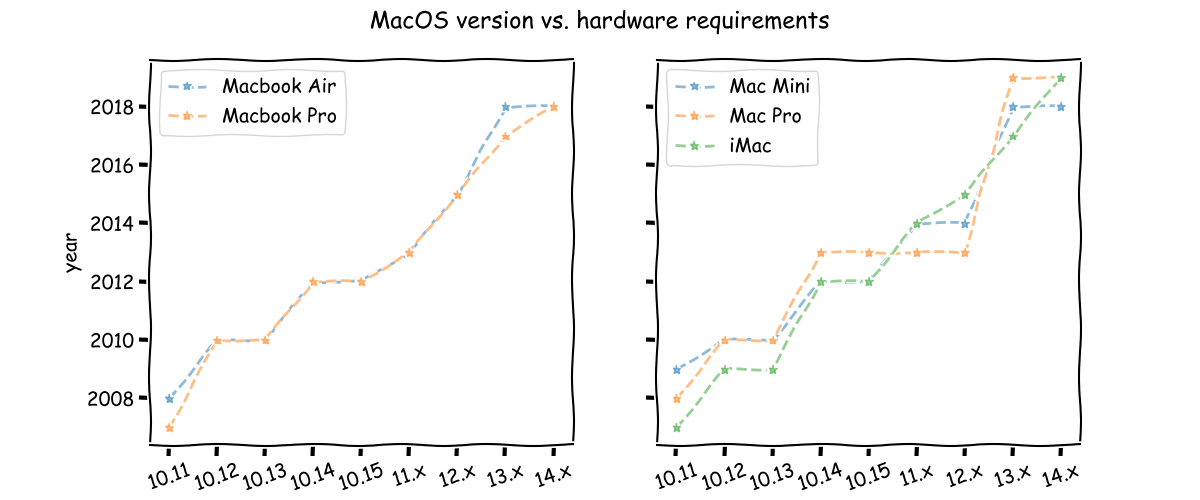
macOS hardware requirements increase over time.
For computers too old for a supported macOS version, consider installing Linux.
Linux normally works very well on Apple computer hardware.
Apple maintains a list of
no longer supported Apple hardware.
Most CMake
policies
default to “OLD” behavior compatible with prior versions of CMake.
cmake_minimum_required(VERSION min…max)
automatically sets all the CMake policies to “new” through the “max” CMake version, limited by the user’s CMake version.
Example: project with cmake_minimum_required(VERSION 3.21...3.26) implicitly sets to NEW all CMake policies CMP0143 and older for users with CMake ≥ 3.26.
A user with CMake 3.22 will get NEW for policies CMP0128 and older.
A user with CMake 3.20 will get an error due to the minimum version given as 3.21.
New versions of CMake don’t get the benefits of new behaviors until specifying the new behavior is OK via cmake_minimum_required(VERSION min...max) maximum version number.
CMake gradually deprecates old policies, such that warnings emit when CMakeLists.txt cmake_policy() or cmake_minimum_required() sets the policy to OLD.
For example, CMake 3.28
deprecated CMake 3.20 CMP0120
and older.
HDFView is a Java-based application to view, create, and modify HDF5 files in a tabular format.
HDFView can also make 1-D (line) plots and 2-D (raster) plots of the data in an HDF5 file.
For example data see
Neon.
To view a plot of data, right click on the dataset name and select “Open As” and then set the parameters to view the data.
It’s important to use a recent version of HDFView, as a long-time issue especially with Linux distributions is having old, broken versions of HDFView.
A typical problem with old HDFView versions is that HDFView won’t start.
Overleaf
paid accounts
can edit Overleaf LaTeX documents offline and Git push / pull with Git direct to Overleaf.
Direct Git access does not require special GitHub permissiongs and works with GitLab, GitHub, Bitbucket, etc.
Once the procedure below is done, you’ll be able to:
git push
push local changes (after git commit) to Git provider and Overleaf simultaneously
git push provider
push local changes to only Git provider
git push origin
push local changes to only Overleaf
git pull
pull from Overleaf
For simplicity, this procedure assumes the LaTeX project is existing on Overleaf to start.
Starting with a project from the Git provider is more complicated since Overleaf cannot accept force push.
SSH Public Key Authentication is in general recommended for Git (besides Overleaf)
One can simultaneously use Overleaf, GitLab, Dropbox, OneDrive, Bitbucket. Just remember to NOT put a LaTeX Git project into a synced Dropbox / OneDrive folder or you’ll get synchronization errors.
When using TeXLive, the “tlmgr” program allows installing many LaTeX-related packages.
For example, to enable Tikz diagrams via \usepackage{tikz}, install the “pgf” package:
tlmgr install pgf
Packages can also be added to TeXLive by the GUI TeX Live Manager.
Under Package List select Status: All.
On Windows computers, after upgrading software or having left the computer on for days since last reboot (closing lid and reopening included), a memory
Access Violation
may occur:
exit code “-1073741819”
hex code 0x0005
Exception Code: 0xC0000005
The simplest and most common fix is to simply reboot the Windows computer.
We see these errors also during software development when building or configuring the build system such as CMake.
Looking at the build directory file
CMakeConfigureLog.yaml
can provide more insights into the issue.
The world is full of inexpensive USB charging adapters.
Since the adapters connect to AC mains power, a very large amount of energy is available that can result in damage to the device or even the home / office the charger is in under catastrophic failure.
Since nearly every person in the world needs multiple USB charge adapters, the manufacturers compete aggressively on size and price.
This leads the OEMs to be tempted to cut back on safety and interfere-reducing components.
Ethical and responsible manufacturers find a way to keep the quality and safety circuitry intact, and may even go beyond the chip manufacturer and safety regulator requirements.
These extra measures help protect the charger brand image.
A distinct retailer known for quality USB charger adapters is IKEA.
It’s speculated that since they’re putting their own brand on the charger, IKEA is perhaps taking notable care to ensure the chargers don’t damage devices or the surroundings.
Unix-like shells typically have a syntax that allows running a command with one or more environment variables having values that don’t persist after the command.
For example, in Unix-like shells:
CC=clang CXX=clang++ make
Runs the program “make” with environment variables CC and CXX temporarily set.
Subsequent commands use the original value, if any, of CC and CXX.
In PowerShell this syntax doesn’t directly exist, but can be effected like:
pwsh -c { $env:CC="clang"; $env:CXX="clang++"; make }
YaML is used by GitHub Actions workflow
expressions.
The “if” conditional logic for a task uses comparison operators that also work to compare strings, especially useful for version numbers.