Before the emergency hits, get a $20 10,000 mAh or larger rechargeable USB power bank.
It’s possible to get 2-3 phone recharges from this bank for each recharge of the bank.
9V battery cell phone charge from 2014 has been disproved independently by the
Daily Mail.
A 9V battery has less than 100 mAh available at the 500-1000 mA charge rate demanded by modern smartphones.
This means the 9V battery current output quickly drops to near zero, while the phone still sees the input voltage, kicking the phone CPU into full power mode.
When a smartphone sees a 5V input on its charge connector, it thinks it’s on a source of adequate power, and starts checking email, syncing photos, putting the CPU into full power mode, etc.
Phones generally do NOT check if the charging source is actually adequate to have a net positive charge.
This means the phone battery will discharge faster by having a 9V battery connected via a cigarette lighter adapter.
Softlinks are useful on any operating system to replace long, complicated directory paths with a simpler one.
Options for accessing remote softlinked paths over SSHFS is best done with the sshfs -follow_symlinks option.
Example:
Server: joe@1.2.3.4 with external HDD /media/BigHDD
Microsoft removed 2gb152.exe (1MB) that was formerly at microsoft.com/en-us/download/details.aspx?id=12972.
CNet has msstdfmt.dll inside file 2gb152.exe at:
Ubuntu with Nvidia driver version 375 may experience rainbow banding effects where shadows are cast.
Workaround A:
setsid compiz --replace
This does not require sudo.
Workaround B: I got tired of having to keep doing the workaround above, so I temporarily reverted back to Nvidia driver 340.
Alternatively, Nouveau also works OK.
“Free” “unlimited” data storage, even for scientists doing multi-generational data archiving, has its bounds, else tragedy of the commons would result.
For Zenodo as of this writing, with a full-gigabit Internet connection, I get Zenodo upload speeds in the 5-20 Mbyte/second range, averaging about 12 Mbyte/second.
That means for the current 50 Gbyte per dataset limit, a 50 Gbyte upload will take me about 1 to 3 hours.
Thus it’s useful to use
good archival file compression
before uploading to Zenodo or elsewhere.
LZIP
is a top choice (also consider XZ or Zstd) for reliable, robust long-term archiving of data.
With any compression algorithm, the defaults are often not the best choice for very large datasets as encountered in radio science or geoscience in general.
Lzip for large datasets: LZIP options we’ve used for large datasets (here with file extension .bin).
Create a file MANIFEST with a list of files to archive. You can do this manually or with a find command, like:
find . -name "*.bin" > MANIFEST
Create a checksum of the files
sha256sum $(< MANIFEST) > SHA256SUM
Archive the files into filename.tar.lz
tar cvf - $(< MANIFEST) | plzip -0 > filename.tar.lz
Lzip single large file: create my.bin.lz.
plzip -k -0 my.big
-k
do NOT have lzip delete the original file
LZIP options: plzip is the multithreaded version of lzip that uses all the virtual cores of your CPU, to go at least N times faster when N is the number of physical CPU cores.
This compresses the files down to 30-50 % of their original size while being as fast as possible.
See the benchmark observations for that greatly increased CPU time doesn’t help compress much more.
tar -I didn’t work for lzip: sometimes the -I 'lzip -0' option of tar doesn’t have any effect–it uses the -9 option of lzip regardless..
LZIP benchmarks: for a 106.9 MByte 16-bit software defined radio dataset (a short test file) I found the table below.
It’s immediately evident that for large, high-entropy (noisy natural geoscience data) that very low compression settings are appropriate.
Similar results for LZMA compression options for large datasets of geoscience auroral video.
It may be possible to tweak further improvements by using dictionary size and match length options, if someone has an extremely large noisy dataset compression problem (e.g. CERN).
Lzip -
Compression ratio
time (seconds)
0
0.471
5.6
1
0.448
18.7
2
0.447
30.8
6
0.407
95.2
9
0.400
116.2
Compression of very noisy datasets: why is there often little advantage in noisy geoscience datasets for high compression settings?
At the most basic level, lossless compression is about finding redundancies in the files.
Self-similarities, autocorrelation, and the like.
Nature is an incredibly powerful random number generator–the opposite of what compression algorithms need.
In contrast to the high-SNR image and text data used by most of the populace, scientists, and geoscientists in particular have instruments that use a very large dynamic range with high sensitivity.
For the radio science and scientific camera domains, this typically means 16-bit high speed ADCs where most of the time, several bits are uniformly zero, and the rest of the bits are highly random, with a slowly changing bias value.
In practical terms, a trivial lossless compression algorithm eliminates those high bits that are so often zero, but even a very advanced lossless algorithm will have trouble getting further compression benefit vs. CPU cycles on typical remote sensing datasets.
this will take several minutes without progress indicator e.g. 4000/10/60 = 6.6 minutes.
Type sync to be sure SD card is done writing.
Insert microSD card into Red Pitaya (contacts facing away from PCB)
Power up Red Pitaya with Micro USB jack nearest board edge.
The flashing LED settle down in 30 seconds to constant green and blue and double-flashing red (or, single flashing orange).
Accessing the Red Pitaya via web browser shows the graphical apps for oscilloscope, spectrum analyzer, and the App Store for free apps like SDR, VNA, etc.
You can also connect to the Red Pitaya via SSH or serial port console.
Connecting to Red Pitaya over Ethernet: the Red Pitaya uses Avahi so that you typically don’t have to search for its IP addresses.
The Avahi address is found as follows.
Use the last 6 characters of the MAC address on the Red Pitaya Ethernet jack (say 12:34:56), and on laptop web browser http://rp-123456.local.
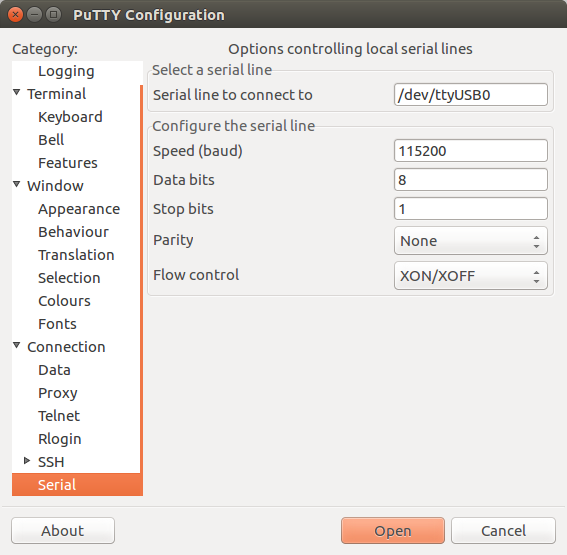
Serial port: if you can’t connect over Ethernet to Red Pitaya, you can plug a standard micro-USB cable from your PC to the Red Pitaya micro USB port next to the Ethernet jack.
Find the serial port
the Red Pitaya is on via
ls /dev/ttyUSB*
Probably it’s on /dev/ttyUSB0.
Then use
PuTTY
to connect to the Red Pitaya with the commonly used settings in these figures below:
PuTTY serial config for Red Pitaya
PuTTY serial config for Red Pitaya
For Pavel Demin’s ecosystem*.zip images for Red Pitaya ham radio, just extract the .zip file to the blank FAT32 formatted SD card.
The ecosystem*.zip contains numerous files and directories, unlike the single .img file in the procedure above.