YaML is used by GitHub Actions workflow
expressions.
The “if” conditional logic for a task uses comparison operators that also work to compare strings, especially useful for version numbers.
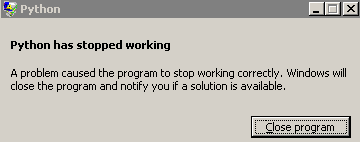
On Windows, program faults can cause an modal window to appear regarding reporting the issue to Microsoft.
This window stops automated scripts from further progress.
This is a problem for long-running programs or scripts that call other programs, perhaps on a Task Schedule.
modal Windows popup blocks programs restart
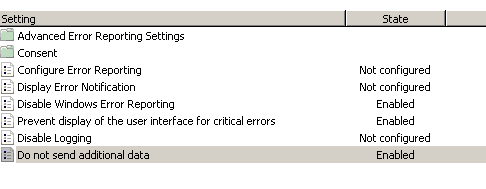
Disable Windows Reporting modal windows on Windows Pro and non-Pro by simply opening “services.msc” and disable “Windows Error Reporting Service”.
Flatpak
is a popular means to distribute software on Linux that installs and runs in a sandbox for each application.
This is particularly useful when an application needs a newer GLIBC / GLIBCXX than the system has, which is often the case on RHEL and HPC systems.
It can be convenient to open a
sandboxed shell
in a Flatpak app’s sandbox.
For example, to open a shell in the GNU Octave Flatpak sandbox:
flatpak run --command=sh org.octave.Octave
This can be useful to build further applications with CMake using a Flatpak program.
If the Git patch file is generated on a Windows computer and is copied to a non-Windows computer, the patch may fail to “git apply my.patch” on the non-Windows computer.
If the mismatches seen with “git apply my.patch -v” show question marks “?” at the end of each line, the issue may simply be line endings mismatch.
Try fixing line endings in the patch file using
dos2unix
on the computer where the patch is to be applied:
dos2unix my.patch
git apply my.patch
dos2unix is installed like “brew install dos2unix” or “apt install dos2unix” or similar.
The
git mv
command tracks moves or renames of Git tracked files similar to the shell “mv” command.
Typically it’s useful to “glob” match patterns of files to move to avoid extra typing.
PowerShell
command substitution
is used with
Get-ChildItem
and “git mv”:
PowerShell can recursively find files like
GNU Findutils
using PowerShell function
Get-ChildItem.
The abbreviated form of Get-ChildItem is “gci”.
Typically the “-Recurse” option is used as the default is to only search the specified directory level.
Examples:
Recursively find all “*.lib” files under directory ./build:
gci -Path build -Recurse -Filter *.lib
Find all files named “example.txt” under directory ~/projects:
gci -Path ~/projects -Recurse -Filter example.txt
Open all files found above in “code” Visual Studio code:
Matlab
loadlibrary
is a straightforward way to use existing C libraries from Matlab.
In contrast, Matlab
C++ interface
takes several steps to setup and distribute, and the C++ interfaces may not be necessary, considering one may be able to use an existing unmodified C library directly from Matlab.
Other options include MEX C++ interface code, where the developer writes a wrapper function accessible from Matlab, this is relatively high performance and straightforward as well.
However, loadlibrary can be the least amount of effort and the end user doesn’t need to compile C/C++ code.
Consider the modest
example
interfacing to the C++ <filesystem> library from Matlab.
Compare that with a similar
MEX <filesystem> interface.
One doesn’t need to build a Matlab class like Ffilesystem.m for loadlibrary.
The loadlibrary approach is more general and can be used with many C libraries having C types amenable to Matlab types.
Observe in Ffilesystem.m that the user provides the path to the shared library (.dll, .so, or .dylib) that could be distributed by GitHub Release or built by the user.
Pointer in / out arguments are handled by
libpointer.
The “delete” destructor unloads the library to avoid resource leaks.
Microsoft provides free
Windows virtual machine images.
The VM image is only good for a limited time.
A fresh free VM image setup is needed after that time.
Decompress and import image into the virtual machine software.
If using VirtualBox: check “Reinitialize the MAC address of all network cards”
ReactOS gives a free, open-source Windows XP API level replacement that can use USB devices.
Sometimes Linux users need to use a Windows VM when USB devices are required in Windows programs.
ReactOS can work in a VM for older Windows programs with a much smaller install than Microsoft Windows.
As time goes on, less and less Windows software is compatible with Windows XP and hence less software is compatible with ReactOS.
Install ReactOS in a virtual machine with the VirtualBox version recommended in
ReactOS install procedure.
Create a new VM with name “ReactOS”, which should auto-populate needed settings.
When installing, use FAT file system instead of buggy, experimental BTRFS at this time.
Disable JavaScript in ReactOS Firefox browser as ReactOS might hang at 100% CPU for JavaScript intensive websites.
Type about:config in Firefox address bar and Toggle javascript.enabled to false.
ReactOS advantages vs. Windows:
ReactOS installation takes 90% less space than Windows
no OS license maintenance with free, open-source ReactOS
no licensing worries about making many copies of a working ReactOS install. Get a VM working and copy it to many workstations.
ReactOS theme feels like Windows XP, so there are few concerns about transitioning users reluctant to change
ReactOS Limitations:
ReactOS 0.4.x API level is Windows NT 5.2 (Windows 2003 / XP).
Programs requiring Windows NT 6.0 (Vista) or newer will likely not run.
Current versions of Python do not work with ReactOS 0.4.x due to the Windows NT 5.2 API level.
Consider trying an older version of the program you want to install that is still noted to work with Windows XP when using ReactOS.
NT 6.x API Windows Vista support is important as many programs, including open source programs, have left Windows NT 5.x unsupported and non-functional for their programs.