It is possible to safely
access the WSL filesystem
from Windows.
For WSL2, the WSL distro need not be running first to access the files within.
WSL2 will automatically start the requested filesystem Linux image and the 9P file server in less than a second upon attempting to access the WSL2 image filesystem.
The WSL distro files are available from Windows under:
\\wsl$\
and
\\wsl.localhost\
To keep things simpler, we still keep files that need to be accessed from WSL and Windows under the usual Windows file system, making softlinks in WSL as useful.
For example, code in Windows under $Env:UserProfile/code is accessed from WSL by one-time:
N1MM Logger is popular amateur radio contest logging software designed for Windows.
It may also be usable on Linux using WINE.
Caveats: This procedure requires some expertise with using WINE and may not work easily.
It’s much easier to just run N1MM Logger on Windows, perhaps in a virtual machine.
Given the rapid development of N1MM, this unsupported procedure may break at any time.
This N1MM logger on Linux was tested using Ubuntu with WINE 4.0 (WINE 3.x is fine too), winetricks 20181203, winecfg set to Windows 7 32-bit
Install procedure:
Setup a 32-bit Windows 7 WINE environment with .NET 4.0, then install the N1MM logger.
Install .NET 4.0 in WINE 32-bit. It takes about 3-5 minutes, and at a couple points in the install, the progress bar seems to freeze, but the console text keeps scrolling. Note that .NET newer than 4.0 might not work for N1MM (thanks Harry Bloomberg for noting this).
Radio control: N1MM can OPTIONALLY interface with your radio to pull out the frequency/mode for the log.
You’ll need to
map the WINE serial port
and then select that COM port in N1MM Logger.
Look for the USB ↔ serial adapter before/after plugin with:
dmesg -w
Start the WINE registry editor:
WINEPREFIX=~/.wine_n1mm wine regedit
Configure the port.
Say your device is seen at /dev/ttyUSB0, and you want it to appear to WINE on COM1.
Edit HKEY_LOCAL_MACHINE/Software/Wine/Ports to have a new string entry named COM1 with value/dev/ttyUSB0.
Restart WINE:
wineserver -k
then reopen N1MM logger wit the script you created in the installation:
~/n1mm.sh
Verify this setting (but do not edit) by:
ls ~/.wine_n1mm/dosdevices/com1
there should be: com1 -> /dev/ttyUSB0
Note: Harry Bloomberg notes that you may be able to specify the specific long device name under /dev/serial instead of /dev/ttyUSB0. This may help avoiding the USB device changing port numbers when plugging / unplugging the USB device.
Alternatives: Currently, ReactOS 0.4.10 is not able to install N1MM logger.
The N1MM Logger install hangs at:
Downloading RGB9RAST_x86.msi
Advanced use: Phil Erickson of MIT Haystack noted that for certain SDRs that use hamlib, you may be able to rewire the output of N1MM into hamlib via socat.
The Visual Studio Code
Matlab plugin
lints code in the editor.
The lint is shown as squiggle underlines with hover messages on the detected code issues.
The VS Code feature
Go to Definition
allows clicking on a function name and automatically opening the code location where the function is defined, even in another file.
This small Python-based
Markdown link-checking script
is effective for large (thousands of pages, tens of thousands of links) Markdown-based websites/
It is immensely faster than the legacy HTML LinkChecker program of the next section.
Alternatives exist for Go and JavaScript.
If using Netlify, consider a
link-checking plugin
that checks tens of thousands of links for each “git push” of the website Markdown in about two minutes.
The PyPI releases are out of date so instead of the usual
pip install linkchecker
we recommend using the development Linkchecker code
Internal/external links are tested recursively.
This example is for a Jekyll website running on laptop:
linkchecker --check-extern localhost:4000
The checking process takes several minutes, perhaps even 20-30 minutes, depending on your website size (number of pages & links).
Pipe to a file as below if you want to save the result (recommended).
List options for recursion depth, format output and much more:
quad-core CPU, GPU, Bluetooth 5, 802.11ac, gigabit Ethernet, USB 3.0
3+
ARMv8 (A53)
1 GB LPDDR2
quad-core CPU, GPU, Bluetooth 4.2 / 802.11ac, gigabit Ethernet
2
ARMv8 (A53)
1 GB LPDDR2
no onboard wireless.
1
ARMv6
512 MB LPDDR2
high power consumption, single-core CPU.
The benchmarks for
Raspberry Pi 2
and
Raspberry Pi 3
show far faster performance than the Raspberry Pi 1 / Zero.
Using the graphical desktop and 4 GB of RAM, the Raspberry Pi 4 is useful for modest desktop use.
The new CPU-direct USB and Ethernet of the Raspberry Pi 4 brings drastically faster IO.
The Raspberry Pi Zero has an ARMv6 single core CPU but much lower idle power for battery-powered applications.
Beaglebone deterministic IO due to the
PRU
is a key advantage for certain applications.
The Beaglebone DDR3L RAM, and ARMv7 CPU is nearly twice as powerful as the Raspberry Pi Zero, native Ethernet, onboard SSD (eMMC), better onboard I/O (for local sensors), etc.
However, CPU or GPU demanding tasks should consider the latest Raspberry Pi or Intel NUC, etc. instead.
Fortran coarrays are an abstract, higher-level construct than using MPI directly.
Coarrays support multiple parallel processing libraries including MPI.
The simpler Coarray syntax can make debugging easier in general.
Gfortran, NAG, Intel oneAPI and Cray are among the compilers supporting Fortran 2018 coarray features so useful in high-performance computing.
Coarray Fortran as enabled in Fortran standard is available from multiple compilers.
Compilers with built-in coarray support (not needing external libraries) include:
Intel ifx
NAG nagfor
Cray ftn
The OpenCoarrays library is popular for enabling coarray features in GFortran.
Install Fortran OpenCoarrays library for Gfortran by:
Ubuntu / Debian / Raspberry Pi (packages names may vary by Linux distro version)
The GCC -march=native flag can cause unexpected and difficult to diagnose error messages on certain CPU arches, including high end Intel Xeon CPUs.
The compiler error messages generally don’t give any clues as to what the real problem may be.
While there can be a small to significant performance benefit to using the
GCC flags
enabling special features in a CPU arch, we feel it’s important to provide software that “just works” by default, even if not completely optimized for a given CPU.
The end users that care most about performance probably have already learned the appropriate flags for their CPU, and are willing to fiddle with the CPU arch flags to get the program running at optimum.
End users can provide the appropriate CPU arch flags for their system at compile time if desired like:
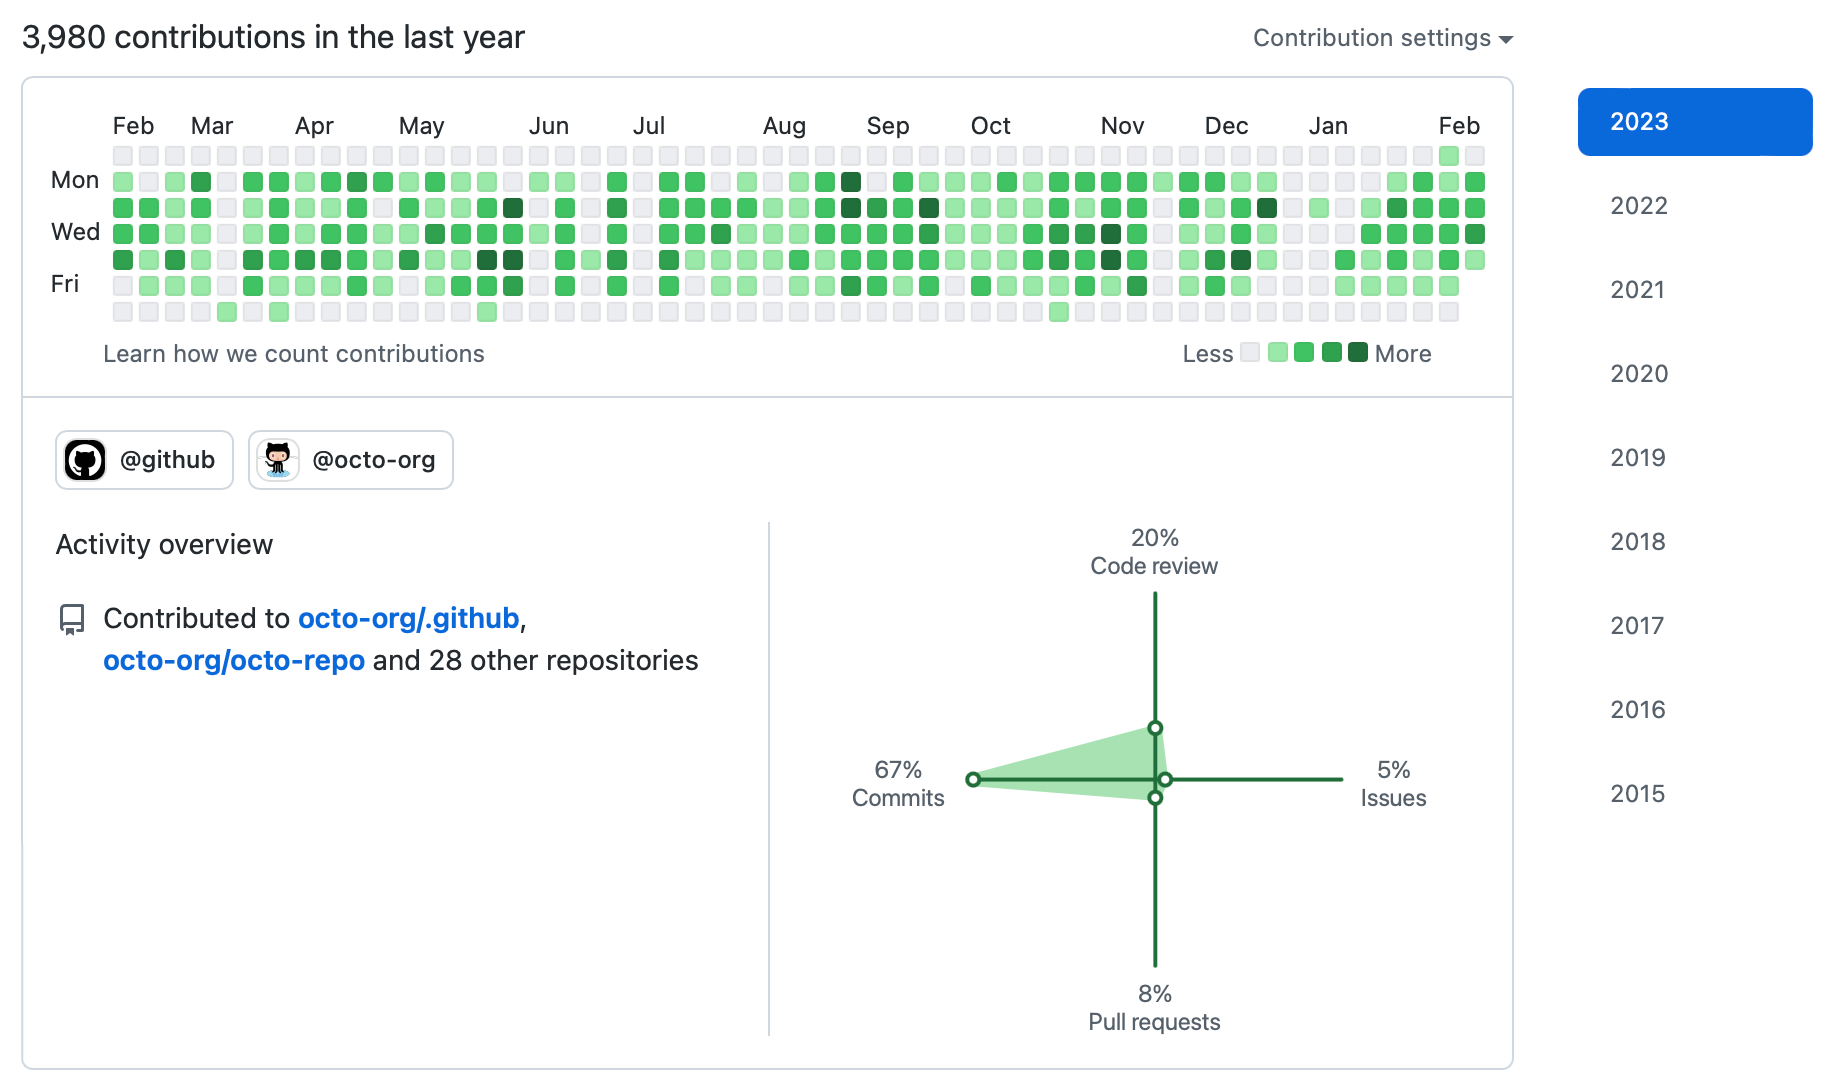
Git contribution calendars are a key way a future client, employer or colleague gets a quick glance at your individual Git contribution level.
Consider including private contributions on the profile.
GitHub and GitLab contribution metrics include more than just Git commits and the corporate versions offer deeper insights to managers.
GitHub depicts contribution types in the contribution rose:
Software is a common core skill necessary for many fields, and it’s important to show the distinction of your software work over time.
Ensure your Git commits are counted over time with the correct Git commit email configuration.
Consider using a “noreply” email address in Git repositories to avoid spam.
Git contribution credit is based on having a Git email associated with your Github account.
Git does not have a integral mechanism to have multiple authors per Git commit.
A Git coauthor notation convention has become accepted by major services including
Github
and GitLab.
Indicate Git coauthor by placing plaintext in the commit message body.
The email address cited must match a registered email with the Git service.
The email can be a working public email or the “fake” noreply email provided by the Git service.
Multiple coauthors each use the same syntax on the same Git commit like:
added foo function to bar.py

Co-authored-by: David <snake@users.noreply.github.com>
The coauthor commits do show up in GitHub search under “Commits”.
Caveats: as with regular Git commits, there is no authentication to avoid someone masquerading as someone else with Git coauthor commits.
Git coauthor commits cannot be GPG signed for each coauthor, only the primary Git committer can GPG sign as usual.
To avoid connection failures requiring reboot of a Windows PC upon resuming from sleep/standby,
consider disabling Windows
Modern Standby
(formerly known as Connected Standby) during sleep.
Modern Standby uses WiFi, Ethernet or other connections, periodically rousting the laptop from deep sleep to sync email and fetch updates.
Only certain PCs are capable of having network connectivity during sleep.
Some PCs lockout (make invisible) the Modern Standby option since there are firmware bugs that would keep the laptop awake (Dell XPS for example).
The option to disable Modern Standby is only present if the laptop supports it and the OEM hasn’t disabled it.
Advantages of disabling Windows Modern Standby:
save battery by not having your computer connected to Wifi while sleeping.
not connecting to possibly rogue AP as you travel about, or being subject to tracking.
some hardware (e.g. Microsoft Surface Pro) often fails to connect to Wifi on wakeup until manually going to Device Manager and disable/enable cycling the Wifi adapter.
Windows Wifi power setting is under the Control Panel → System → Power & Sleep.
If present, uncheck under “Wi-Fi” the “stay connected…sleep” options.
Check configuration: from Command Prompt, type:
powercfg /a
# which is a shortcut for:powercfg /availablesleepstates
if the response includes
Standby (S0 Low Power Idle) Network Disconnected
then the PC is set to disconnect from WiFi on sleep.
This command works even if the OEM has hidden the option in the Control Panel (like Dell XPS).
To help diagnose problems with Modern Standby, Windows provides from the factory the
SleepStudy
tool, invoked by:
powercfg /sleepstudy
This outputs an HTML report–copy and paste the filename from the Command Prompt into the web browser.
The filename is like “%WINDIR%/System32/sleepstudy-report.html”
The Windows SleepStudy report contains a great deal of nerdy but useful power system info, including battery life state.